Behind a maze of stone, hidden within the caverns, a tomb from a forgotten time - built to heap forgotten praises - hides the riches of a resting hero. Some have braved the catacomb: and many have not returned! Have those who returned bled the cavern dry? Are there yet jewels and gemstones - perhaps wisdom or lost magics - hidden yet amongst the rubble. Who will it be to find the lost hero's hoard - and who else will perish, an added corpse to a growing graveyard!

|
|
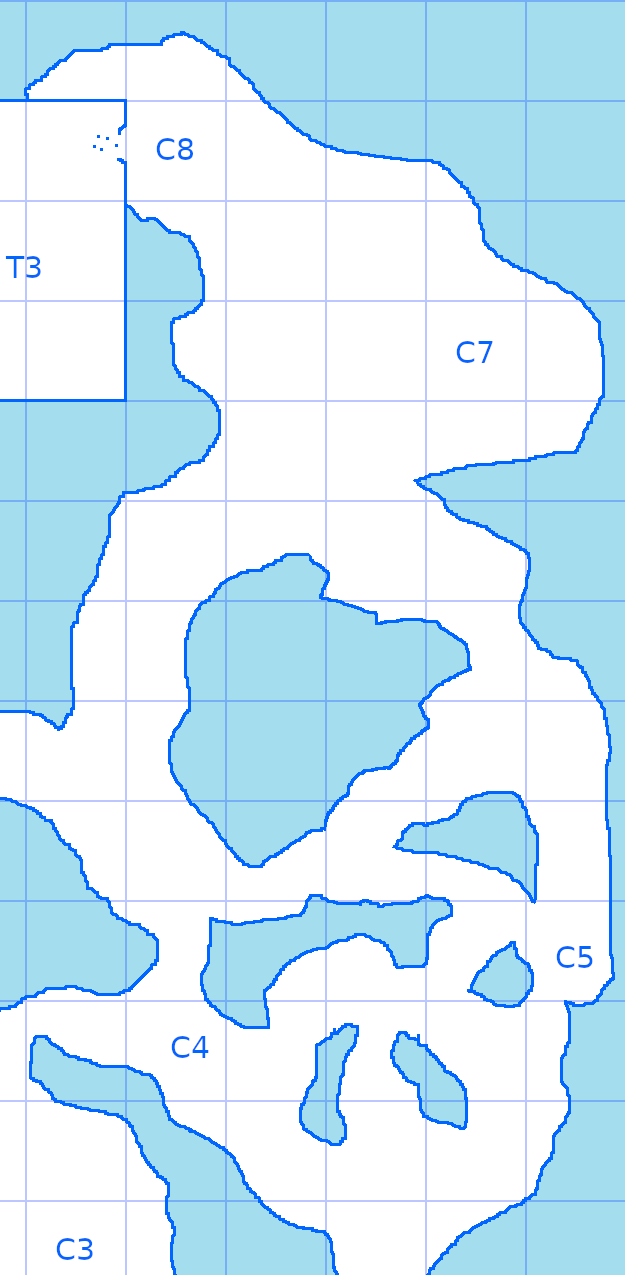
Scale: 10 ft. Click HERE for a PDF version of this adventure! |
| • |
|
A little keyhole icon means the door is locked. |
| • |
|
A little "S" through the door means the door is secret. |
| • |
|
The other icon - which is supposed to look like a muscly arm - indicates the door is stuck and must be forced open. |
Suitable for 3rd level characters.
C - Caves

C1 - Spike Trap
Three corpses - dry and skeletal - sit against the walls: two against the north wall of the passage running west, one against the north wall. Their breastplates have been punctured with a wide hole: the cadaver against the north wall is pierced through the heart; the others, pierced through the liver and stomach regions: fatal wounds, surely, but not immediately so.
If characters continue north, there is a tripwire which releases a spiked log that is positioned slightly south. A generous referee may allow a character to note its presence if they look up and back, towards the exit. When tripped, any character within 10 feet of the north tunnel must Save vs Paralysis - again, a generous referee may allow a bonus to the roll proportional to their armor class - or be struck by the swinging log: which deals 3d8 damage on failure, or 1d8 damage on success. In either case, the affected characters are pushed against the north wall, near the corpse.
The trap, after triggering, slowly resets itself over 1 dungeon turn.
On the two corpses to the south can be found 200 silver pieces and a Cat's Eye worth 10 gp.
On the corpse to the north can be found a set of keys: keys which will open the locked door marked #2, and also the door marked number 3 OR 4, randomly determined.
C2 - Hidden Blade Chamber
A breeze, fresh air, comes from the southern passage at this point. A character which walks into the southern passage comes up to brush and bracken: well lit - as though in a grove. Passing through, they are teleported to a location outside, not far from the dungeon. The teleport is one-direction: if they seek to return, they will find only bushes and must trek back to the entrance of the complex.
A character which closes their eyes while walking through will not be teleported: instead finding the rear of the chamber. Inlaid in the wall is a stone anvil, around which can be found 100 silver and 300 gold pieces, and in which is laid a Sentient Sword +1: Blade of the Oracle. The sword has the following characteristics:
- Intelligence: 11
- Ego: 3
- Communication: Auditory (Lawful)
- Alignment: Lawful
- Powers: Detect Slopes, Detect Shifting Architecture, Detect Magic

The sword will release itself from the anvil to any Lawful character or to a Neutral character on a positive reaction. It fancies itself a discerner of truth and respects honest characters.
C3 - Ruined Camp
The ruins of a camp - with several human-made mundane articles, cookpots, tents, bedrolls, etc - slowly decays here. There is nothing of special value - but perhaps an enterprising party may make creative use of the folderol.
C4 - Echo Chamber
Characters passing through this area can hear distant conversation - as though between friends. If the party is passing northbound, the conversation will be jovial, about the treasure they intend to find; if southbound, the conversation will be panicked, about a wounded comrade. There is a 2-in-6 chance that if the party stops to listen, a reference to the secret door to T4 will be made.
These echos occur only once: fading to silence after the party leaves the area.
C5 - Altar Nook
In a nook to the south of this bend has been placed a Chaotic altar - a lead pan sitting beneath a woven shield: tassels made of suspiciously stained hair coming down from the shield in seven equidistant points on the rim. Both altar and shield are mundane.
C6 - The Find
Tool marks mar the surface of the stone-hewn walls to the north, though only shallowly: the make of the geometric wall being much harder than the natural cavern. There are scuffs on the floor - as though things had been dragged around it - with some preference to the northern pass.
C7 - Spider Corner
The entire space is lined with spider webs; though the closer one approaches the east corner, the thicker they are. Three Black Widow Spiders (B43) lie in wait to prey on passers-by.
C8 - The Breach
A puncture has been made in the walls of the tomb, rocks and debris having fallen haphazardly into the next space. The breach is small, however - and any party in heavy armor (unless the armor-wearers are small in stature) will take a full turn to successfully navigate through it.
T - Tomb

T1 - The Hollow Watcher
To the north-west, a large statue in somber pose shows signs of damage. It has been hollowed out, with bits of carapace scatter around, signs of damage done to an insectoid. Under the statue in the hollow space, evidence of the mouth of a tunnel going down has been obscured: filled in with sand and rubble to block whatever is on the other side. On closer investigation under the statue, 6 gold nuggets of varying sizes can be found, amounting in value to 1,800 gold pieces.
To the north, the secret door is concealed only by the bulk of the statue; a character which edges behind will find it: however only one party member at a time can squeeze through, as the space is constrained by the stone.
Six Driver Ants (B34) are exploring the room, pecking at the blocked tunnel mouth.
T2 - North Chamber
Four large sarcophagi - ten feet by five, each - are aligned to run parallel to the walls, south-west to north-east, in the room. Two blank panels - as might hold a piece of art - can be seen on the north-east wall. In the center of the room - bull's-eyed by a cross drawn from the corners of the sarcophagi - is a lamp stand with eight candles.
Of the secret doors:
-
The door to the north-west is a sliding faux wall, disguised to look like
the stone. It is activated by pair of touchplates on the floor - one beside
it and one four feet distant - that must be pressed simultaneously to open
them.
-
The door to the north-east is hidden behind the more southern blank panel.
It is activated by a switch concealed in the nearest sarcophagus.
- The door to the south is an illusory wall. If half of the eight candles are lit - one on, one off - then the smoke therefrom will tend towards this door as though carried by a gentle current and the wall, itself, will become partially translucent and navigable: posing no barrier to entry or exit. Extinguishing any of the flames - or allowing the candles to burn out (which will occur naturally after 6 turns) - will cause the wall to re-solidifiy.
T3 - Forgotten Store
Broken wood and stone litter the floor. Amphora - mostly empty, some few sealed and containing oil - can be found by the south wall. The room smells vaguely of burial spices: though none are yet present. A Halfling adventurer (Lvl 1: B10) armed with plate, a shield, and dagger is prowling in the room, examining its furnishings, having come from the breach to the east.
T4 - Tomb of the Champion

A huge suit of armor - stature of a man over eight feet in height - sits against the south wall. If investigated, it is filled only with dust. Atop the helmet sits a crown, laced with silver and webbed with gold. The crown is worth 1,300 gold pieces.
Against the east wall is collected a great hoard of treasure, accounting to the following:
- 2,000 sp
- 1,000 gp
- 1 small topaz (10 gp)
- 2 circle-cut rubies (50 gp)
- 1 rough diamond (500 gp)
- A diadem sized for a normal human (600 gp)
-
A scepter with a quartz pommel in the shape of an owl's head (1,000 gp)
- A pair of bracers, encrusted with tourmaline (1,600 gp each)

T5 - Abandoned Pool
The foundation of a pool - keyhole shaped, with a stair down to get in at the north-east face - is inlaid, drained and dry, in the room's floor. The depth to the flat side, on the north-east, is four feet: the circular section to the south-west forms a gradual bowl, descending to eight feet total depth below the floor level.
A solitary Tiger Beetle (B31) is in the room, with a 2-in-6 chance it will be about the perimeter or a 4-in-6 chance that it will be in the pool's recess.
T6 - Hall of Robbers
A row of skulls 2/3 sunk into the stone - arranged as a wainscoting rail - lines both walls of this hall; rib-cages protruding from the corner created by ceiling and wall form arches in the hall every 15 feet. Halfway up the hall, 4 Robber Fly (B41) wait, hidden among the skeletal architecture. A torn cloth pouch on the floor - 17 silver pieces spilled before it - betrays their location.
T7 - Hall of Wilting
Carved skeletal faces face downward, mouths open, from a high point in the center of the walls in each cardinal direction. In the center of the room is a ring akin to a compass rose - which will slide if stepped on or forcibly moved. It is pointing at one of the three doors to this space: determined randomly when the party first arrives.
If any of the three doors is opened when the "north" icon on the spinning floor compass is not pointing at it, a yellow light flares from the mouths of each of the skeletons. All characters in the room when this occurs must Save vs Spells or be aged 2d10 years.
T8 - Skull Hall
Oriented south to north, a relief depicting a helmeted skull has been carved into the floor. On each of the corners, a torch-holder extends; the holders are empty.
T9 - Memorial
In the northern section of the room, a statue of a large knight stands with an equally imposing sword jammed into an anvil in front of him. Cut flowers - desiccated and some decayed - line the floors leading towards the statue.
The room is unusually comfortable - compared to the rest of the complex: which may be cool or damp. A party which rests in this room will be doubly invigorated by it - requiring rest again after 2 hours (or, the 12th turn) rather than 1 (or, the 6th turn).
T10 - Thorned Hall

At the end of each hallway is a potted plant - a black, thorned thing sitting before a wall. A character which moves the plant will find underneath it a dial, which can be turned to unlock the secret door to which they are adjacent.
The plant is toxic: if touched intentionally or accidentally (chance according to referee's discretion, but proportionally lower if proximity to the plant is avoided), the toucher must Save vs Poison: on a failure, the character falls into a coma and will die after 1d4 turns if not saved with appropriate medicine or magic; on success, the character becomes nauseated - unable to cast spells or use skills and suffering a -2 penalty to hit and damage in combat for the next 1d4 turns instead.
Public domain artwork retrieved from
OldBookIllustrations.com
and the
National Gallery of Art. Attributions in alt text.