Sunday, April 28, 2024

Solo Adventures with Scutifer Mike

Play-Cast Name:
OSE Solo Play,
Scutifer_Mike
System:
Where I Watched: YouTube
Chainmail with Shield

Thoughts and Review

What I Liked

First and foremost - lands-a-livin', RULEBOOK!

Among the foremost purposes of the original inclination in writing reviews of actual play presentations like this one was expressly to provide insight on the pedagogic merits of the myriad of actual plays that line video and audio networks alike: and the first thing that stood out to me, even in the first video or two, was the adherence that Mike keeps to the book. 

Is adherence to the book the most important thing about an actual play? About a game? No - however, when you are learning the game (as he was in this video series and as the potential viewer, interested in Old School Essentials or Advanced Old School Essentials coming into the OSR for the first time would be, learning the rules is key to experiencing the genre and experiencing the game in a manner consistent with its design. Further, someone who has never played AOSE or an OSR game (or someone who has played other OSR games and is curious about AOSE) will benefit from a by-the-book presentation of the game in that it will present to them the kind of adventure the game is going to produce as well as illustrate how the mechanics work and feel at the table: informing their decision to pursue or not to pursue the game system based on that illustration. 

For that reason - it is a selling point for actual play productions to adhere to the rules: and on that selling point, Mike deserves triple kudos. Not only does he present the rules, play the rules, present the experience, illustrate the experience, but all the while - he has the book in front of him and cites the actual text by which he is playing. Scutifier Mike has produced a brilliant learning tool - and in so doing, does an immense service to the hobby.

But wouldn't it get boring, if it's just a dude walking through the solo play rules? Not hardly. Mike deserves credit for keeping it interesting - allowing the dice to tell the story - and using the results of the rolls to help inform the emerging narrative. For example, the party meets a group of not-Bullywugs: the reaction rolls are initially positive, but turn against the party in subsequent negotiations. From these rolls, Mike infers that the not-Bullywugs are friends or kin to another group of not-Bullywugs encountered earlier: whom the party had massacred. As some other dice-driven solo-players have done, Mike rolls the dice... then interprets the results: producing a story that is new even to him as he films it. This serves a dual purpose from the perspective of the audience: first, in keeping things interesting; and second, in illustrating for the viewer a perfect example of emergent narrative.

This is not - of course - to state that your planning as the DM is meaningless as the dice make the connections for you in play: but instead an example of something that does come up; that you can do in the referee hot-seat. And moreover, it illustrates for audience members who might have been more familiar with "narrative gaming" meaning that the DM had a plot in mind before for you to follow - that's not how OSR games work: and that it's something to be treasured!

And the game evolves. 

At the beginning (and truly throughout) there is a focus on dungeons and underground exploration: but also, as the party gains more resources, they hire mercenaries: and there is overland combat, mass combat, with faction politics within the hex map driving the interaction. Mike showcases - solo - most elements of the game: including several of those elements which do not make a show in more modern-focused actual plays: the overland adventure and wargame roots.

Lastly - I like that Mike, over these videos, was learning the game.

He makes mistakes, he rolls with the corrections, and he makes fewer mistakes as the game rolls on. This attitude is essential for the learner - and I respect him for putting it out on the air and for the effort he put in to trying to get better at simultaneously playing and running the game. From experience, solo gaming (especially trying to record solo gaming) isn't as easy as it may seem.

Aspects to Note

For folks who are interested - after partaking in this playlist, finding some other videos, maybe checking him on X (formerly Twitter) - you will find he is fallen in with the BrOSR. This is not an endorsement nor condemnation - but if you have a thing against points of debate and rule interpretations that arise in context of BrOSR, you may find deeper diving to be against your taste. Alternatively, the exposition of certain BrOSR-flavored concepts, most immediately 1:1 time, may serve as an anodyne way to get a peak at what the fuss is all about. Admittedly, I almost titled this article "BrOSE" - but didn't want to appear like I was farming clicks.

More personally, Mike can be very ... enthusiastic. It appears to be working - as between when I started writing this review and when I released it, his channel had gained 200 followers - but as an early Millenial / arguably last-second Gen X - the gleeful exuberance can make me occasionally cringe a bit on his behalf. That in mind, I know that I get excited about things and have my own way of expressing them - surely, proverbial "young people" see my presentation, my mode of expressing excitement, and think to themselves, "Damn, Grandpa, who taught you there was a wider internet than Facebook and Nextdoor?" So I won't judge. And honestly, after the first dozen or so episodes, I'd gotten use to it.

More relevantly - however - and more fair to the material - one last thing to note, if you are coming in and learning the game: he uses some supplemental material which many will argue with you is not OSR. In particular, the 5e DMG comes to mind: why use the 5e version when the perfect version is so easily available? However - he does clearly identify what he uses when he uses it - and by whom it is written. So - while some of it may open your eyes to potential utility in additional product - it likewise, on occasion, may expose you to more wide a range than some more purist avenues of the OSR may be.

In Conclusion

Scutifer Mike's solo Advanced Old School Essentials playlist is a great expose on the rules, on the experience, and a testament to the enjoyment you can have playing with yourself. It's not perfect - but that's OK: as it is consistent. You only need to watch a handful of episodes - where there are dozens available - to benefit: making it easy to be off to the races. For that reason, and because I lost the platemail .GIF file for the ratings uploads, I personally rate this playlist Chainmail with Shield. (Does anyone actually pay attention to the rating AC? The actual review may be long - but just seeing the title is how far I figure most folks get into these things.)

But all that aside - Scutifer Mike has done the hobby a service by producing this playlist. I truly believe it is worth the time to invest - and even if you don't have much time to invest in it, the value, the quality of the playlist is consistent: and it will continue to earn returns for your gaming edification the longer you invest in it.

Delve on, readers - and delve on, Mike!

Saturday, April 13, 2024

Maze of Moaning

Scale: 10 ft.
For a PDF version of this adventure, click HERE.

Regarding doors:

A door marked with the letter S is Secret.
A door marked with the letter L is Locked.
A door marked with the letter J is Jammed (stuck) and must be forced open.
Swing direction is indicated for some doors. Doors without swing direction slide upward, as a portcullis, but are still solid - blocking line of sight and missile fire when closed - unless expressly indicated.

Suitable for 2nd level characters.

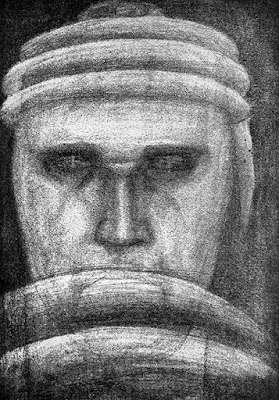
Head of Minos; John Trivett Nettleship

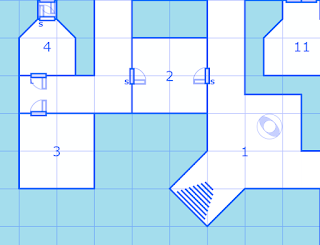
1. Entry

A stairway terminates in an open space - the statue of a faceless man, arms crossed across his chest, stands in the center of the room. If the characters pass it by, a groaning can be heard - a mourning - almost as though the statue is lonely and enjoys their company. It is otherwise non-sentient.

2. Embalmer's Room

On the north wall are two wooden shelves sparsely populated by funerary tools - including picks for the removal of organs and preservative chemicals: bottled and caustic to smell. Some metal tools, rusted, lie on the floor.

3. Guardian Dead

Torn paper and cloth litter the floor. Seven Zombies (B44) stand aimlessly in the room. On the south wall, past the Zombies, a preserved corpse hangs chained to the wall, its feet off the ground, with a heavy chest affixed to it via the same chains. The chest has a padlock on it, but contains 1,000 silver pieces if opened.

4. Equality in the Grave 

Two concrete slabs interrupt the stonework in the floor - parallel to one another, running north to south, like grave-covers. A torn purple banner hangs half-way on the north wall. The room is otherwise empty.

5. Four Pillars

Four columns - ionic in style - hold up the ceiling: equidistant from one another and from the outer walls of the room. Torch sconces - empty - are mounted to the east and west walls. The room is otherwise empty.

6. Tilting Coffin

The east and west walls of the space have a slow-rising ring about them: about one foot in depth, it starts at ground level at the door to the north and terminates at the secret door in the south, having reached the ceiling. Two braziers stand with ashes at this culmination.

In the center of the room is a metal coffin, upright and open - propped up by a stone pyramid, on a dark red-brown octagonal dais. If a character approaches, there is a chance the trap will trigger: the dais tilts aggressively backwards, prompting a Save vs Paralysis: on failure, the character falls into the coffin - which snaps shut and crushes the character for 2d8 damage.

If the character dies, the trap resets, spilling the pulp onto the floor. If the character survives, the trap does not reset, trapping the character inside until the others can find a way to retrieve their comrade.

7. Oratory

Stone benches - three to the west and three to the east, face northward towards a similar stone platform, 8 feet wide and elevated by 8 inches from the floor. A decorative chain rings the platform - valued at 90 gold pieces, if retrieved, but weighing 450 coin weight.

8. Robber's Corridor

Brass lamp stands line this hall - three each to the east and west - and aging evening blue valance slowly molders along the ceiling line. A Robber Fly (B41) is hidden among its drapings.

Treasure Chest Chain Castle Brown; Pixabay User HOerwin56
9. Lost Treasure

Two skeletons sprawl on the floor. 

Against the south wall are several amphora - inside which can be found coins - 1,200 silver and 100 gold - in addition to some residues, implying liquids that once might have been valuable as well.

10. A Ladder Down

A dim blue light illuminates this room. In the center of the space, a circular platform slowly rotates - oddly, however, its foundations show no seam on the floor. Looking down into the platform, there are lines criss-crossing: the source of the illumination - and a ladder leading down. Room 16 is visible through the orifice - and that is where the ladder will lead if climbed.

The moaning of the statue in room 1 is still audible in this space.

11. Honorarium

Six plaster statues stand - supported at a slight angle by wooden sheets stuck into grooves in the floor - in formation, facing each other, east and west. On the south wall, an oval embossing decorates and frames a center image which has faded to time. The plaster figures appear unpainted - but if chipped away - actually house the bodies of forgotten, embalmed humanoids.

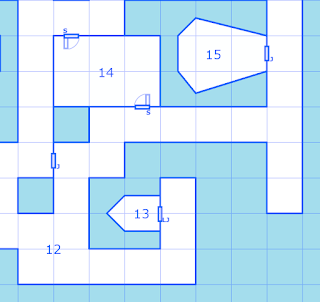
12. Junction

The moaning of the statue in room 1 is still audible in this space. Beyond it, however, it becomes too faint.

13. Snake & Saint

Two altars, north and south, funnel the eye to the far side of the room - where, in the west nook, a statue of a kneeling man rests. A Pit Viper (B42) is curled around the statue; at its feet and along the altars can be found 600 silver pieces, strewn about.


14. Zombie Pass-Way

A metal lattice runs across the ceiling - from which chains dangle, affixed beneath the lattice to allow movement, but not to exit the space. Eight Zombies (B44) are collared to the chains, having freedom of movement within room 14, but not outside of it. In the north-east and south-west corners of the room are stone constructs almost akin to hearths. In the north-east, ashes cover a box - in which 300 silver coins can be found; in the south-west, five gold-lined porcelain figurines: value 100 gold pieces each.

15. Tribute Room

The north and south walls house man-sized cubbies in which the skeletons of long dead and desiccated men at arms still stand. On the west wall is a mosaic depicting a kneeling figure in midnight blue armor; although the details and some of the color have worn off.

16. A Ladder Up

An oblong, hexagonal structure is divided asymmetrically in the center of the room - parts filled with water, parts dry. The water emits a thin blue light, illuminating the space. 

A ladder extends - slowly rotating - upwards. If climbed, this ladder leads to room 10.

If placed in a jar, the water will continue to emit light for 2d4 turns before becoming mundane (albeit pure) water. Mundane water poured into the hexagonal retainer does not, itself, illuminate: instead visibly sinking to the bottom, where it forms a bubble - distinct in itself.

Design for a Beetle Shaped Pendant; Jean Toutin
17. Beetle Sanctuary

A dead adventurer has been skeletonized by eight Oil Beetles (B31) who linger in the room. On the dead adventurer's person - among some largely useless mundane gear, can be found 200 silver pieces and a pearl worth 100 gold.

18. Undead Storage

Scraps of material - small and broken, largely unidentifiable - litter the floor. Eight Zombies (B44) occupy the room among the folderol.

19. A Gray Trick

A door in the south wall appears identical to other portcullis style doors in the complex - however hides a small sloped compartment behind it rather than a true room. Confined to the compartment is a Gray Ooze (B36), sliding out of the compartment as soon as the door is opened. The Gray Ooze will be entitled to a surprise round, if thus liberated.


Public domain or open license artwork retrieved from the National Gallery of Art, Pixabay, and OldBookIllustrations.com. All artwork has been adapted for thematic use. Attributions in alt text.

Domicile Beyond the Caves

For a PDF version of this adventure, click HERE . ...