
 | |
| Scale: 10 ft. Click here for a PDF version of this adventure! |
A - West Prison

Of the Ogres mentioned, there are two, and they are laughing jovially, sitting and rolling and generally enjoying themselves in a small pile of treasure. The pile is 1,000 gold pieces. One ogre is juggling two cut rubies, each worth 100 gold pieces, and a topaz worth 50 gold pieces; the other ogre is wearing a golden torque worth 50 gold pieces as a bracelet.
A2 The northern wall of this room is 15 feet east to west with a door on the western side. The west wall is 10 feet north to south. From the south west corner, the wall runs east 5 feet before cutting north at 45 degrees, closing off the triangular space at the north-east corner.
One Ogre (B40) angrily pouts in this room. He was tossed in and trapped by his fellows in A1 and will be grateful to be released. The room is otherwise empty.
B - Warden's Rooms

B2 Along the south-west curve of this hallway, there are six small busts, around eight inches in height, made of a silver alloy and worth 10 gold pieces each inset into small alcoves. However, one of the six - rolled randomly - is on a weight-sensitive plate. If removed, a blade slides down within the alcove, dealing 1d4 damage and - unless a successful save vs wands (or DM discretion) is performed - severing the hand that removed it.
B3 The room is square, 15 feet east to west and 20 feet north to south. A door on the north wall, near the north-east corner, is locked, but can be unlocked with a simple mechanism from the southern side of the doorway. There is another door on the east wall near the south east corner.
The ceiling is a pockmarked metal grate of tight weave. In the center of the room is a reinforced wooden chest suspended roughly five feet in the air by chains running into holes in the four corners of the room. Beneath the suspended chest is a drain. If the equilibrium of the chains is disturbed - that is, if the chest is tugged, cut free, or otherwise the weight of the chest is altered by 400 coins or more - a clack can be heard and the disturbed chain or chains loose, going limp and falling to the floor: at this point, acid starts raining from the ceiling onto anything in the room. This acid deals 1d4 damage per round the character is exposed and an additional 1d4 damage per round for 1d4 rounds once the character has escaped - save versus Dragon's Breath for half initial damage and negating the ongoing damage. Once triggered, the trap will continue to rain acid for 1 turn (10 rounds) - after which point it will reset itself after 1d4 turns - the hidden acid cistern refilling through unreliable mechanisms.
Inside the chest can be found 200 silver pieces, 200 gold pieces, and a +1 Sword (+2 vs Spell Users).
B4 The northern wall runs 20 feet east to west, as the western wall runs 20 feet north to south. Conversely, the south wall extends only 10 feet eastward - as the east wall extends only 10 feet southward - before they cut towards one another at a 45 degree angle, rounding the corner and shaping the room like a gemstone on its side. Exits are on the north wall to B2 and the west wall to B3; inside, a nest of 4 Harpies (B36) sit like bower-birds atop 4,000 electrum pieces, scattered about the nests. Propped to one side, apparently discarded by the creatures, is a scroll case with a Scroll of Protection from Lycanthropes in it, as well as a single Potion of Levitation.
C - North Warren

C2 This room is 20 feet by 20 feet, with a 10 foot long (east to west) by 5 foot wide hall leading from the north-west corner to a door to C1. On the north wall, near the north-east corner, is a double door. On the east wall, near the south-east corner, is a locked door.
The room itself is furnished with lavish, velvet furniture - a heavy sofa, a heavy ottoman, and two matching chairs. Six Dopplegangers (B33) occupy the space.
C3 The room is an oblong octagon - 20 feet north to south and 20 feet east to west, where the cardinal walls (north wall, south wall, etc) are 10 feet long each. A double door dominates the south wall; a second single door on the southern half of the east wall.
Against the north wall is a sarcophagus - 9 feet east to west by 5 feet north to south - with an adornment atop carved of stone, shaped like a muscular humanoid: the body is a muscular, picturesque human male; the head is a nondescript blankness, like a mannequin, which has horns facing down. The sarcophagus is empty - albeit some bone fragments and dust - but if the lid is moved, the floor in front of the sarcophagus opens - anyone within 10 feet must save or be dropped into a pit of filth-coated spikes: taking 1d6 damage from the fall and 1d8 damage from the spikes. Additionally, any character taking at least 4 points of damage total must save versus poison to resist infection: which will incubate for 2d4 turns before manifesting a fever and halving the character's Constitution score. It will heal normally at a rate of 1 point per day of rest.
C4 The hallway, 10 feet east to west by 30 feet north to south, has two exits - both on the west wall: one by the south-west corner and one near the north-west corner, inside a five foot deep alcove. The east and west walls have alcoves as though to hold statuary, carrying what appear to be urns. Two Harpies (B36) are crawling about the space - breaking the urns open. Inside are cremains - but in addition, the harpies carry 1,000 silver pieces and inside the urns - between all of them, are another 500 silver pieces and 5 trinkets, each worth 10 gold pieces.
C5 This hallway is 10 feet east to west by 20 feet north to south. A pair of doors face each other in the east and west walls, five feet from the north wall; a third door - locked - leads south. On the north wall is a tapestry - eight feet tall by four feet wide - of a muscular humanoid - the head having horns and its face nondescript, like a mannequin, but with piercing black eyes. Any character which examines the tapestry is drawn to the eyes, which force perspective of the remaining physique to be larger and more intimidating - at which point the examiner must save versus spells or shrink to 6 inches in height, as with a Dimunution effect.
The tapestry can be rolled up and removed - weighing 100 coins. The magic does not dispel and can continue to be used, but the victim gains a +4 bonus to the save if outdoors or in an otherwise appropriately spacious area.
D - East Prison
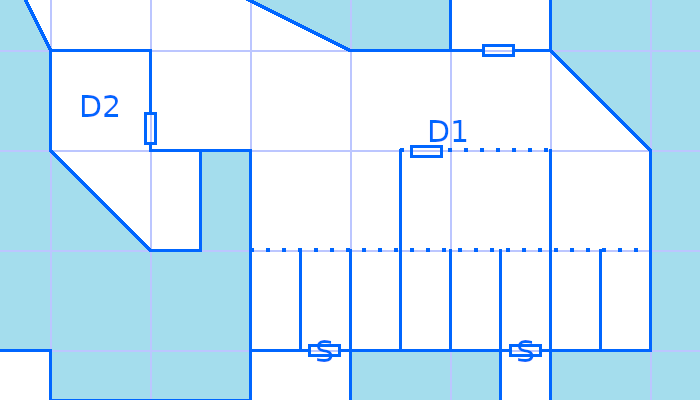
In the southern section of the room are isolation cells - 10 feet north to south by 5 feet east to west, with the north-facing sections walled off by barred iron portcullis and the other three walls made of stone. Inside each are manacles or other instruments of captivity - excepting the second from the west, which is clear, and the third from the east, which contains broken crates. The first three from the west wall, out to 15 feet from, are open to the main space; as are the last two from the east wall, out 10 feet from. The remaining 15 feet and three cells are contained behind a 10 foot north to south by 15 foot east to west space - the east and west walls made of stone, extending from the stone partitions of the cells - and the north face made of iron bars. A door to this space, barred, is accessible in the north barred wall, near the north-west corner. Inside both of the non-standard cells are faux panels in the south walls - four feet by four feet - that can be removed to lead to H1 or a hallway to G7, respectively. The hallway has another secret door leading to G7, but the secret doors are both obvious from the other side.
Inside this space are two crystal golems - stats as Living Statues of Crystal (B37) - standing atop two pedestals - one of silver, the other of brass. They can speak without moving their lips and will ask the party of the mystery of captivity: the answer, according to the statue on the brass pedestal, is that in order for the many to be free, must the few be held captive; the answer, according to the statue on the silver pedestal, is that only in captivity - were our needs are provisioned and our minds thereby freed from bodily decisions - is one truly free.
The statues will not willingly relinquish them, but if they are offed from the pedestals, inside the silver pedestal is 1,000 silver pieces; inside the brass pedestal, 600 gold pieces.
D2 The north wall of this space is ten feet east to west. The room proceeds 10 feet south, then curves to the west, another 10 feet southward and five feet to the east: looking on a map much like an opening quotation mark. In the north-west corner are three skeletons that appear to have been clawing at the wall. In the five foot alcove on the south-east wall are shelves with buckets, brooms, and other supplies. There is one exit - a door in the north-east wall. It is not locked from the outside, but has no handle or obvious mechanism to open it from the inside.
The alcove is trapped. If a character interacts with the shelving, it will shift, causing the door to slam shut. The room is airtight - with 12 hours of air total: one human-sized adventurer consumes 1 hour of air per hour; a torch, if lit, will likewise consume 1 hour of air per hour. A lamp, lantern, or halfling will consume 1/2 an hour of air per hour. When the air runs out, any flames will extinguish and any characters trapped inside with asphyxiate.
E - The Bath
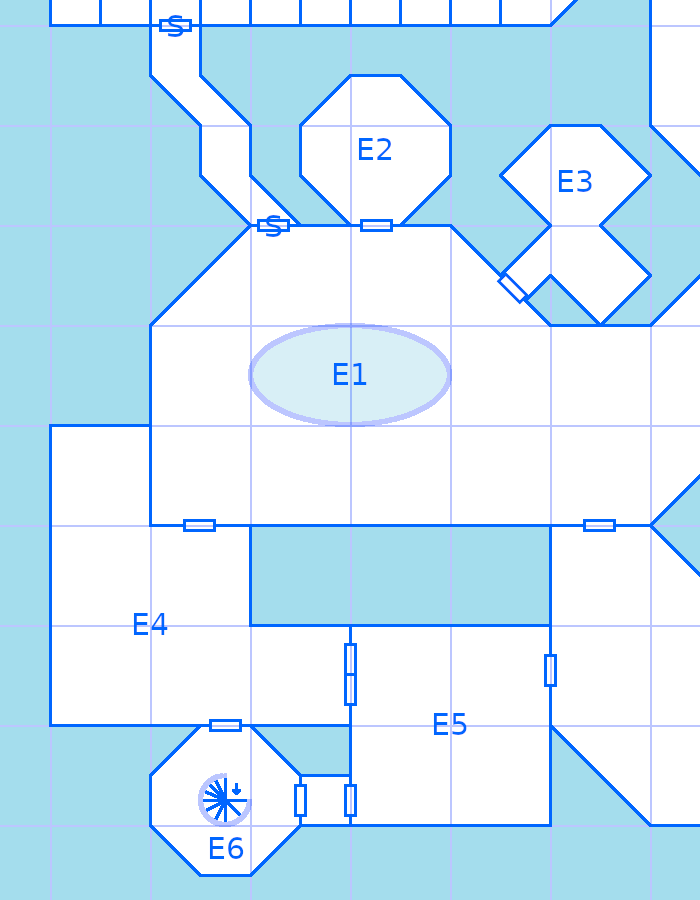
There is a pool in the middle of the main space - ovaloid, 20 feet east to west by 10 feet north to south, where the western extent of the pool is 10 feet from the western wall of the chamber and the southern extent of the pool is 10 feet from the southern wall. In the center is a statue of justice - a female figure, blindfolded with scales: the scales have stones on one side and a few copper pieces on the other - the scale is tipped in favor of the stones, but will adjust if weights are added or removed. Inside the pool are an abundance of fat tadpoles which will follow a light source around. If a character waits and watches the tadpoles, they will begin to whisper to said character: they barter in secrets and truths - if a truth is told to them in confidence, they will in exchange whisper something true of equivalent value. What constitutes "value" for secrets is at the discretion of the DM.
Exits are as follows:
- South, to E4 - locked - near the south-west corner.
- South, to F2, near the south-east corner.
- North, to E2, in the middle of the northern wall of the concave section.
- North-east, to E3, in the angled wall connecting the northern wall of the concave section to the main space.
- North - secret - a stone panel that will slide out of the way if a weight is placed in the statue in the pool's hourglass that balances the scale - 10 feet west of the exit to E2. It is easily identifiable, not not easily opened, from the other side.
- East, a double door - quite heavy: opens as if stuck - to F1 - in the southern section of the eastern wall.
E2 In what appears to have been an octagonal crypt, 15 feet in diameter with one exit in the south face, 3 Ogres (B40) lounge on pilfered pillows and rugs. There is a sarcophagus, but the lid has been removed and broken, its contents replaced with food items, like a buffet.
E3 This oddly shaped space is comprised of two main areas - on the northern half, a hexagonal space - the faces 5 feet long; on the southern half, a square space angled south-east, approximately 7 feet deep. Exit is through a 5 foot wide by approximately 5 foot deep hall leading to a door facing south-west to E1.
In the square space are two bunks and an end table. They look infrequently used.
In the hexagonal space are 200 silver pieces strewn about the floor; five silvered figurines, six inches tall and worth 10 gold pieces each; a necklace of pearls worth 25 gold pieces; and a necklace of electrum worth 25 gold pieces.
E4 The room, from above, is shaped like stairs: the south and west walls are 30 feet long, where the north wall is tiered, 10 feet each, "descending" south at right angles by 10 feet at the end of each tier. The floor is a checkerboard of tile - blue and black in a diamond pattern - and has a suit of plate armor with a halberd in the north-west and south-west corners. The floor is trapped - if a character moves to examine the armors, they may step onto a trigger plate (any blue diamond in the western-most 10 feet of the room) which causes a volley of barbed darts to launch from the northern wall across the affected area. Targeted characters may save against dragon's breath to avoid - at a +2 bonus if standing 10 or more feet away; +4 bonus if standing 20 or more feet away. A character struck by darts takes 2d8 damage. It takes one combat round for the dart launcher to reload itself.
Exits are:
- North, locked, in the second northern wall "tier" to E1.
- South, locked, in the center of the southern wall, to E6.
- East, in the east wall of the lowest "tier" - close to the south-east corner.
E5 This room is 20 by 20 feet square - the floor has a large circular rug on it, which appears to have been dyed at one point, but wear and time has obscured the image. Empty torch sconces line the walls. A door to F2 is on the northern-half of the east wall; a door to a small hallway leading to another door, stuck, to E6, is on the west wall by the south-west corner, and a double door on the northern side of the west wall leads to E4.
E6 This room is octagonal - five foot to a face. In the center of the room, a spiral staircase leads down. Exits are on the north face (locked) and the east face (stuck). A lone Tiger Beetle (B31) scurries up the stairs as the party enters.
F - The Great Hall

On the south face is a double door leading to F2. On the west wall, just beyond the 20 foot mark, is a double door leading to E1. In the north-west corner, a 10 foot wide hallway leads north-west.
F2 The east wall of this space is 20 feet north to south. It continues westward at this width for 30 feet before the north wall curves north - the south wall continues 10 feet further before curving north, such that the west wall is also 20 feet north to south, but 10 feet more north than the east wall. A double door 10 feet from the east wall leads to F1 in the north wall. A double door, barred - treat as stuck, near the south-east corner leads east. A door in the west wall, near the south-west corner leads to E5 and a door in the center of a 10 foot flat space on the north wall near the north-west corner leads to E1.
G - South Warren

G2 This hallway is patrolled by 5 White Apes (B30). Strewn about the floor in the first 30 feet or so of the hallway are 600 silver pieces and 200 gold pieces - as though the apes had flung them about for sport.
G3 This room, 30 feet east to west by 20 feet north to south, contains wooden furniture; some of which is broken, some of which is not: chairs and a dining table. The walls are lined with square wainscoting. A door to the south is in the center of the south wall. On the north-east corner, one of the wainscoting panels gives way, a secret door that leads to H3.
G4 An Ochre Jelly (B40) rests atop a sarcophagus in this octagonal room, 15 feet in diameter and 5 feet to a face. One exit, a stuck door, in the north face. The sarcophagus is empty - its contents presumed dissolved by the jelly.
G5 This room is an octagon, 15 feet in diameter, with a sarcophagus on the south face. If the party opens the sarcophagus, there is a 3-in-4 chance it opens into the underside of one of the other sarcophagi - in C3, E2, or G4 determined randomly. One in four, it is simply empty. If the party climbs through, the teleport bi-directional until the lid is placed back on the sarcophagus in G5. A new roll is made each time the lid is opened.
G6 The north wall of this space is 30 feet east to west, the south wall 10 feet, with the corners of the south wall running north-east and north-west, respectively, at a 45 degree angle such that the room has a vaguely triangular shape. A fountain with a carving of a Medusa atop it protrudes from the center of the north wall. If a character drinks the water, they must save versus petrification or be turned to stone; conversely, if it is poured into the throat of a petrified character, they may save versus petrification to turn back to flesh - getting it into said throat will be the tricky part.
There is a door to the south and a door to the north-east. A secret door - faux stone obscured by green algae - leads to H3 in the north-west.
G7 In this room is a candelabra with ornate crystal carvings. Light sources shining through it refract on the far side of any light source. A character may roll to hear a humming noise that emanates from the crystals. Any character caught in the refracted light must save versus wands or suffer a consequence based on the color they come into contact with:
- Red (Decrepitude): target ages 2d6 years immediately.
- Orange (Circumspection): target doubles their rate of trap detection, but moves at half speed - both exploring and in combat - for 2d4 turns.
- Yellow (Malady): target loses 1d4 points of Constitution. Save again in 24 hours or damage is permanent.
- Green (Matriculation): target, distracted by minutia in the environment, becomes doubly likely to be surprised, suffers a -2 penalty to reaction rolls, and cannot maintain eye contact. Save again in 24 hours or condition is permanent until removed with Remove Curse spell.
- Blue (Probity): target is unable to speak falsely, engage in deception, or utilize abilities leading to misdirection until they have had a full night's sleep.
- Indigo (Hallowing): target becomes incorporeal, unable to interact with the physical world, but still visible, for 1d4 hours.
- Violet (Enigma): target may not use class abilities for 1d4 hours.
- Missed! The target is untouched this time...
H - Vault

H2 This room contains a statue of a powerful looking man, but its head has been broken off and the base has been used for storage. In this room can be found a pouch of 12 lodestones worth 50 gold pieces each, a crown of emeralds worth 100 gold pieces, two chests containing 2,000 gold pieces each, another 1,000 gold pieces spread about the floor as though there was not enough space to fit them, three scepters - one with a white head, the others with midnight blue - each of which are worth 250 gold pieces, three necklaces worth 200 gold pieces each, three diamond rings worth 150 gold pieces each, four gold bands worth 100 gold pieces each, and a golden figurine of a bull, eight inches tall by ten inches long, worth 100 gold pieces.
H3 Secret doors, obvious from this side, lead to G3 and G6 in the south-west and south-east corners, respectively, of the south wall of this 5 foot wide space. On the north face is a double door which a Medusa (B39), as the party enters, appears to be unlocking with an iron key.


This comment has been removed by the author.
ReplyDeleteChrome screwed up my last comment, trying again:
ReplyDeleteI love it, from the acid trap, to the tapestry, which I can totally see my players using as a banner, to the little detail of the white apes playing with coins! There's so much great stuff in here. I especially like how you show us the sections of dungeon you're talking about so I don't have to keep scrolling up and down. It's a little touch but very appreciated. What a fantastic dungeon!
Thank you for your comment! It's awesome to know there is stuff worth using. Keep gaming, brother!
Delete