
 |
| Scale: 10 ft. Click here for a PDF version of this adventure! |
X - Entrance

A spiral staircase leads into this room from above. Entrances to W1 and E1 are barred barriers that appear to be carved from stone. Doors in both are locked. Door to N1 is stuck. Two Giant Weasels (X42) are rooting around in a pile of wooden crates to the south. Inside one of the crates is a lockbox containing 94 platinum pieces.
Under the crates is a floor-grate, three by six feet, akin to a street drain: it can be removed by the strong or dedicated to gain access to H1: into which it’s an eight foot drop to a moist stone floor.
West Wing
W1 - The Humming Hall
The walls of this hallway have solid-color pieces hanging on the walls, each around 8 by 10 feet. Characters walking through this hall hear music faintly playing somewhere in the dark - but will not be able to tell from where it originates. The door to N2 is locked. The door to W2 is not.W2 - Control Room
Doors to W1 and W7 are not locked. The barrier to W4 and W3, like the exits from X, is made of worked stone: barred, such that a character can see through. The doors have no handle and no hinge: sliding down into the floor in order to open.In the center of the room, there is a raised platform - two inches off the ground - that has a fixed lectern projecting from it. There are two holes in the top of the lectern. If a player stands on the platform, it sinks down - two inches below the ground level - causing two knobs to rise out of the holes in the lectern. If a knob is turned, a clunking noise can be heard and a corresponding door opens: when the south knob is turned, the door to W3 opens; when the north knob is turned, the door to W4 opens. The knob can be turned back the other way, closing the door again, but only after the corresponding door has fully opened. If the player leaves the lectern without applying a counterbalance, it will rise again - concealing the knobs and closing the doors, regardless of configuration.

W3 - South Cell
This circular room has a drain in the center - five feet diameter, removable by a strong or determined party - partly made of iron. It has been corroded and eaten by four Rust Monsters (B41) who are sniffing about the room. The bars to W2 cannot be corroded, being stone; but the monsters can see anyone who enters W2. Also visible in this room is a low trough which appears to be filled with specie - 400 gold pieces, 1,500 electrum pieces, and 2,000 silver pieces, to be exact. Beneath the drain is an 8 foot drop into the Maze section.
W4 - North Cell
This room has a low trough, broken on one side, with nothing in it. An off-putting stain marks the floor on the eastern side of the room. The door to W5 is locked; the door to W2 can only be opened from W2.W5 - Scriptoriulum
 |
Dusty furniture - a card table, chair, and stool - stand unused in this small space. An Ochre Jelly (B40) is under the table. |
 |
W6 - Burned Tiles The doors to W5 and W8 are locked; the door to W7 is not.
|
The north-east and north-west angled walls in this space have inset mosaics in them depicting figures in armor. Age and what appears to be fire damage makes it hard to make out the subjects.  |
W7 - The Torch Room

The material is flammable and will function as a torch - but requires two hands to carry safely.
W8 - Blocks and Cobble
The floor in this room is comprised of uneven blocks that shift slightly when stepped upon; it does not constitute difficult terrain, but a character without boots might have discomfort walking across quickly due to the edges. Around the perimeters except door thresholds, protruding six inches from the wall, is a clean and even baseboard.
The door to N7 is stuck - obviously so - as the base of it seems flush with the floor: the blocks having crammed up against it. If the door is opened, the blocks in W8 fall through, dropping anyone inside into a 10 foot pit with fungus growing at the bottom - a character may save, at referee discretion, to avoid the fall. Any character that does fall takes 1d6 damage from the fall - but then must also, due to spores, Save vs Poison or grow dizzy - suffering -2 to any checks made requiring visual focus or manual dexterity for the next 1d4 turns.
The trap will not reset on its own.
The trap will not reset on its own.
North Wing
N1 - North Hall
The floor of this room has a concentric square - roughly five feet wide by five feet less than the length of the room, north to south - made of burnished marble. Doors to N2 and N3 are stuck, but not locked; doors to N4 and N5 are locked; the door to N7 is unlocked and not stuck. Six Hellhounds (X33) are patrolling southbound.
The secret door to N6, if exposed to flame, slides open smoothly and effortlessly.
N2 - West Globe
The inside of this room is spherical, less five feet from the radius of the room: that is, on the ceiling is a concave, circular shape above a matching concave, circular indentation on the floor, the perimeter of which rings the room, five feel from the walls. There are four sconces for torches - only one has a torch in it, and it has long since burned out - on the corners where cardinal directions meet: north-east, north-west, south-east, and south-west. The hemisphere in the floor is slick to the touch.N3 - East Globe
The inside of this room is likewise spherical, less five feet from the radius of the room, as is N2. Likewise, there are four sconces. Hidden in the hemisphere in the ceiling is a single Gray Ooze (B36). Lying in the hemisphere on the floor is a half-eaten humanoid, dead, slumped over a chest. Inside the chest - which is locked - can be found 1,000 silver pieces and a porcelain figurine worth 200 gold pieces. N4 - Shrine of the Star
This space is claustrophobic - the ceiling only six feet high. In the west corner is a small votive space in which there is a bowl with a dried Alstroemeria flower, with six iron spikes arranged in a circle around it, pointing outward like a star.N5 - Shrine of Growing
This space seems claustrophobic at first, the ceiling being only six feet high at the door. However, if a character steps into the space, they find it to be larger than it appeared - from an outside observer, they appear to be shrinking as they enter: such that the five foot space could be treated as 25 feet deep.A similar votive table to N4 sits on the far corner: with a bowl - upturned, such that it serves as a convex protrusion from the table - surrounded by four silver spikes, upturned, point facing the ceiling. Beneath the bowl is a dried Bellflower. The table appears to be 3 feet off the ground from the door, but is 15 feet off the floor when a character stands directly next to it. The silver spikes are six inches long, but if retrieved, shrink as they are removed - such that they are the size of thimbles - worth around 6 silver pieces - when removed from the space.
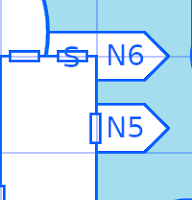
N6 - Shrine of the Statue
This space is very tight - the ceiling is six feet off the ground, but requiring a step down - six inches - to enter. In the far corner is a stone pyramid, three feet tall, the top of which cut off into a step - above it is a cylinder, hanging down, a plug into which is being held up by a golden statue, perched on the stone pyramid step. The statue is worth 1,200 gold pieces - weighing 400 coins - but if removed, the seal falls with it and a torrent of acid spills into the room, filling the room and spilling out 2d6 feet into N1 under the door. The acid deals 1d6 damage per round a character is exposed to it - plus 1d4 damage per round for 1d4 rounds after, unless neutralized.N7 - The Hemisphere
The ceiling for this large space is concave - like the top of a globe from the inside - beyond a five foot wall, as a cylinder, from the floor. There are five bands - as latitude - that slowly spin, with adjacent bands spinning the opposite direction. In the center is a candelabra - 25 feet off the ground - which is enchanted with magical flames that burn cold and will never go out; emitting light as a lantern. The door to N1 is not locked; the door to W8 is stuck.East Wing

E1 - East Hall
This hallway is lined with aged heraldry on the walls. An odd smell can be detected, stronger as the party approaches room E5.
The door to N3 is locked; the door to E2 is not.
E2 - Fountain Foyer | |
 |
In the center of this room is a small fountain - a gray-green algae covering the water and slowly colonizing the stone. Around it is a circular rug - a circle cut in the center such that the stone fountain, and a stone floor, is haloed on the floor. No doors are locked. If the characters reach into the water, the algae is harmless, they will find a handle. When pulled, this hidden handle will open the door to H16. |
E3 - Ring Basin

There are stone statues - ovaloid, eight inches tall - suspended in the space by a small granite column. In the base of each are small basins full of copper rings: approximately 150 of them total, worth approximately 15 silver pieces if melted down.
 E4 - Bone Room
The northern five foot alcove in this room is full of bones, some of which are partially dissolved. In the south-east corner is a barrel with 6 torches and 4 pints of oil. The secret door to H14 will open smooth and effortlessly if exposed to flame.
E5 - The Chessboard
The floor of this room is covered in a square tile grid of alternating colors, black and dingy white, about three feet to the side. The the room thus, being 20 feet deep and 40 feet wide, will be 7 tiles deep and 14 tiles wide. The black tiles give off a dim light, enough to see by - as a candle. Flanking the room's entrance are two statues of horses, rearing.
On the northern wall in the 7th and 8th tiles, east to west, are two thrones on which a regal male and female statue sit. The throne seat is six feet off the ground, the figure extending an additional four feet in height.
- The male statue wears a cloak in-lined with platinum threads - when worn, it grants +2 to all Saving Throws and +1 to Armor Class - and carries a sword. The sword is decorative - counts as silvered, but suffers a -1 penalty to hit, as it's made of combat-inappropriate metals which are worth 250 gold pieces to a collector. The figure wears a helmet on which a single red gemstone is embedded: if pried loose, this gem is worth 600 gold pieces.
- The female statue wears a broach - platinum inlaid - worth 400 gold pieces as well as a tiara worth 600 gold pieces and a Ring of Spell Storing. The ring is on a finger which connects back to the statue, however: presenting a challenge as to how it may be removed.
- If miss-stepping into a white space, the character is affected by a blast of cold - 2d8 damage. A successful Save vs Dragon's Breath is allowed for half effect.
- If miss-stepping into a black space, the character is affected by a noxious cloud. The character must Save vs Poison - on a success, they vomit profusely, taking 1d8 damage; on a failure, they pass unconscious for 1d4 hours after having suffered the first effect. An ally may minister to them creatively to try to wake them.
Monstrous Mini-Maze
M1 - Reading Nook
A stone table and stool - both acid-washed - sit by an empty candle holder, propped in the corner at this end of the maze hall. An Ochre Jelly (B40) is lurking behind.M2 - Urn Junction

Six Hellhounds (X33) have overturned two of five large urns at this junction. The urns are largely empty, though there is an odd stale smell that escapes if they are opened.
M3 - Storage Rack
Around this corner are stains on the floor. An empty weapon rack is beset by four Rust Monsters (B41) who are rather cramped in the space.M4 - The Ribbon Room
Wide white ribbons of varying length hang from slits in the ceiling through this alcove. They are surprisingly sturdy and can be tied together as rope, but must be cut down in order to be of use.M5 - The Prize of the Maze
A small chest is chained to the floor at the end of this narrow. The lock and three of the chains have been eroded off; the chest is empty.M6 - Former Denizen
A skeleton in an alien cuirass and helmet has been shot with six silver arrows here. It is crumpled on the floor, sitting against the east wall with its arms crossed: one hand pointing north; the other pointing south.Hidden Wing

H1 - Hidden Foyer
There is an eight foot drop from the secret entrance in X to the floor in this room. None of the doors adjoining this room are locked.
H2 - Blade Idol
In the center of this room is a pedestal on which stands a chrome idol, the value of which is 400 gold pieces. Circling it are several hanging bladed apparati - slowly rotating on a track recessed into the ceiling. The closer a character gets to the idol, the more quickly the blades spin - requiring a successful Dexterity check - or save, at referee discretion, to bypass.The door to H1 is not locked.
H3 - Wash Closet

Inside is a single skeleton, facing down, an empty washbasin, and a pile of dusty and faded robes, once purple with red trim.
H4 - The Slick
This room is ringed by three steps, taking it down three feet from all the doors. The floor is wet and slick with algae.
The double door to H10 is barred from the other side; the other two doors are not locked.
H5 - The Crushing Atrium
The doors to this room open inward; neither of them are locked. There are a couple old polearms, two helmets, and a decayed leather hauberk on the floor. The polearms and leather are thin enough not to warrant concern - but the helmets appear to have been crushed. There are two large rollers on both the east and west walls, inlaid to a groove in the wall. There are several points of light shining down from the ceiling onto the floor.
If a character enters the light at all - such that the beam is broken and part or all of it can no longer reach the floor - there is a grinding sound and the floor starts to roll upwards: preventing the doors from opening. It will take 2d4 rounds to roll flush with the ceiling - not wholly so, but within a few inches: entirely close enough to crush and kill anything larger than a rat that is in the room.
After reaching the ceiling, the trap lingers for a few seconds before rolling back into place, resetting after a further 2d4 rounds.
H6 - Center Stage

The doors on the west corners are embedded in stone grates - which can be seen through, similar to the exits to X, and are locked.
The door north is not locked; the door to H11 is stuck.
H7 - Bishop's Tomb

H8 - Guardian Tomb

If any of the sarcophagi are opened, three Wraiths (X42) form - emerging from the sarcophagi individually, regardless of which one is opened. If a brazier is lit, the Wraiths each suffer a cumulative -1 penalty on To Hit rolls (so, -2 if both braziers are lit) and become strike-able with non-magical weapons: albeit with a 50% chance of total miss (rolled before or after the player's to-hit roll, depending on the generosity of the referee) if using a normal weapon due to partial corporeality.
H9 - Tapestry RoomThe east wall of this room has two large tapestries in it: one to the north, depicting a cavalryman with a purple plume and red trappings about his heraldry, hanging; one to the south, depicting a countryside township overshadowed by a tower bearing a purple and red flag, having come loose and piled on the floor. Bugs scramble out of the fallen tapestry, if disturbed. |
 |
H10 - Flower Hall

There is a bar across the double door to the north. The door to the south is locked.
H11 - Forgotten Guard Station
The door to H10 is locked; the door to H12 is not; the door to H6 is stuck. Standing guard in this room are two skeletons wearing chainmail armor and armed with a spear and shield. The skeletons are not animate nor undead - just regular skeletons standing there. Their bones have been vitrified, shimmering with a glassy sheen.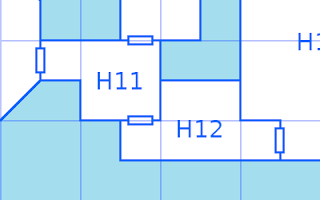 |
 |
H12 - The Unguent Altar
In the northern alcove of this hallway can be seen an end table with a cloth across it. Also sitting are three poultices which, if applied to a victim of poison, will allow a re-roll of a failed Save vs Poisons, as well as a lantern, unlit, with six hours worth of oil in it.H13 - Scriptorium Proper
Two rows of illuminator benches and easels run north to south in this room. Between them can be found illumination supplies - that is, rare colored pigments, application media, etc. - worth 500 gold pieces. In addition, against the west wall, near the north corner, is a relief statue of the moon, as a face. In its mouth flickers a pink gemstone before several neatly stacked rows of gold coins flanked by several small piles of sand.
Whenever light passes through the pink gemstone - as it would have to in order to illuminate the gold coins - it refracts an odd radiation on the other side such that any organic matter coming into contact with said light is subject to a disintegration effect. Non-metallic items must save or be destroyed; living material - such as a player - will immediately take 1d6 damage and must Save vs Spells: on a failure the point of exposure, such as a hand reaching for coins, is destroyed - turning to sand. If no light is passing through the gem, the effect does not occur.
There are 600 gold pieces inside the face of the moon's mouth. The gemstone - sans effect - is worth a further 1,000 gold pieces if sold due to its odd color and large, oblong cut.
H14 - Entry at Waking

H15 - Dome of the Magician
Four narrow and short passages lead to a junction, above which is an ovaloid hole in the ceiling. Climbing through this hole reveals the larger ovaloid chamber - wherein statues depicting figures in armor face the center from cardinal directions and four additional statues wearing robes face outward from the non-cardinal directions.
The ceiling is embossed with a relief carving of the vernal firmament as it was approximately 1,200 years in the past, however if any spell with a defined duration is cast in this room, its duration is doubled for this instance only. Spells with one-off effects, or permanent effects, have those effects instead increased by 20% if cast expressly in this room.
Two Owlbear (B40) have taken up residence in the space.
Two Owlbear (B40) have taken up residence in the space.

H16 - Evening Entry
A Carrion Crawler (B32) is scuttling around this otherwise empty room. The secret door to E2 is obvious and easy to open from this direction. To the south, the ceiling is dramatically low - four feet only - but at the entrance to H15, drops four feet at the junction leading to H4 and H5.
Public domain art respectfully pilfered from the National Gallery of Art and from ReusableArt.com on the week of October 4th, 2020, and adapted for thematic use. Attribution in alt text.


No comments:
Post a Comment