

|
|
Scale: 10 ft. Click HERE for a PDF version of this adventure! |
Suitable for 2nd level.
| • |
|
A little keyhole icon means the door is locked. |
| • |
|
A little "S" through the door means the door is secret. |
| • |
|
The other icon - which is supposed to look like a muscly arm - indicates the door is stuck and must be forced open. |
A - Watch Chambers

A1 - Guard House
Newer, used wooden furniture graces this room. One chair, however, has been
smashed - the remains of two legs - apparently burned - have been cast to the
south wall.
A2 - The Old Barracks
Bunks - unused - line the south wall. On the east wall, a weapon rack with 1d3 usable pole arms and a suit of rusted out chain mail armor. Searching the bunks will turn up a coinpurse with 200 sp and 300 gp still in it.
A Green Slime (B36) is lurking on the wall beyond the door; if smashed inwards, the door will crush the slime, sending sprinkles of it around the area. Any character involved in the forcing of the door must Save vs Paralysis (taking the better of two rolls) or be splattered by the slime.
B - Gnoll Mausoleum

B1 - Foyer
Two statues - left and right, both defaced - stand in the alcove to the north. The floor transitions into tile. One Gnoll (B35) is serving as a lackadaisical sentry, guarding the room and keeping idle watch.
B2 - Bullying Cell
Two Neanderthal (B39) are bound and captive in this space - under interrogation from a group of 5 Gnolls (B35). The Gnolls want to extract information regarding the Human explorers in section C: not realizing that a Neanderthal and a Human are different species.
B3 - Holding
Straw is sparsely spread on the ground. A single tin sits against one wall. A pedestal - as though a bust once adorned it - is on the ground, toppled, near the west alcove.
B4 - Bunk
Several straw pallets have been arranged around the floor. Fleas can be seen visibly bouncing around the space. There are a couple wooden boxes - among which a net of 1,100 silver and 200 gold pieces can be found within.
B5 - Shrine

A statue, its construction different than the rest of the architecture, has been erected in the northern section of the room. The statue is of the god of Gnolls and is 8 feet in height. Of the statue:
- Its eyes are made of two yellow diamonds (500 gp each)
-
On its left ear, it has a small ruby (10 gp) embedded in its ear, depicting
an earring; on its right, an emerald (50 gp) in the same fashion.
- In its navel, a cut citrine (100 gp) is embedded.
- In its outstretched hands, a Sword +1 rests.
On the floor around it can be found 1,200 silver pieces - some of which have fused together. This is indicative of a trap laid on the magic sword. If a character attempts to take the sword, a lightning bolt strikes from the eyes of the statue - Save vs Spells or take 4d6 damage. Removing the eyes of the statue will disarm the trap.
B6 - Corridor Untraveled
On the north and south walls, there are cubbies - 4 to the north, 4 to the south - each containing an urn. The urns contain 20 silver pieces each, buried under slips of paper with short notes written on them - faded and in an alien script.
Against the east wall near the secret door - but not blocking it - is a chest containing 400 gp: however the chest is trapped - if it is opened without disarming the mechanism, such as perhaps identifying a line to a gas container or perhaps noting an egress and clogging it when opening, a poison gas emerges: Save vs Death for any character within 10 feet.
C - Catacomb

C1 - North Crypt
A sarcophagus sits in the center of the room. If opened, it reveals a bearded, half-mummified skeleton in a red tabard with a sword across its breast and iron crown on its head. The sword and crown, both, are rusted: however if the sword is pulled, it will pull a mechanism hidden in the cadaver's rib cage and open the door to C2.
C2 - Ring Room
This room is lit by four torches - ever burning - but apparently made of stone and melded to the wall. Any light sources brought into the room find themselves replenished - resetting their "turn count" to 0, such that torches will have 6 full turns left and lanterns, 24, following their egress from the room. No turns are consumed by light sources if in this room.
In the center of the room is a pedestal on which sits a cushion, on which sits a Ring of Protection +1. Piled around the pedestal is a trove of 300 sp, 200 gp, a garnet (10gp), two rubies (10 gp each), and a black pearl (100 gp).
C3 - Rug Secret
At each right-angled corner of the room stands a brazier. The braziers are emblazoned with icons: a falcon, a cat, and a toad. In the center of the room is a thick, triangular, red rug - oriented such that its points indicate towards the braziers.
Under the rug is hidden an emblem of a sword. If the sword is pulled upwards, it will activate a mechanism to open the door to C2.
Four Veterans (B44) - having followed a treasure map regarding the Ring of Protection +1 in C2 - are fiddling with the braziers, lighting and extinguishing in combination, trying to figure out the secret.
The toad brazier is blocking the secret door to C5, causing it's "stuck" condition.
C4 - South Crypt
A crypt is sunken into the floor here, covered by a sheet of slick, gray stone. At its head, a statue with an axe stands, the head of the axe resting on the floor. If the party contains an aligned character - Chaotic or Lawful - the statue will follow them with its head: if the character is Lawful, it will talk to them: but only if prompted, the character engaging first. In regard to useful knowledge, it knows about the knight entombed here in whose likeness it was carved and it knows something of the layout of section C - however it is absent minded and prone to tangents.
C5 - Iron Arch
An iron-engraved stone arch runs across the north wall. In the center, a likewise metal plate is inlaid on the floor. The plate is magnetized - if a character with metal armor passes over it, a current builds up in the arch to the north - drawing said character towards it. Any characters in the room carrying ferrous metals must roll against their Strength score: 3d6, if they are only carrying some metal items - like a dagger or sword; 5d6 if they are clad in mail or plate armor - if the result is equal or under, they are able to successfully evade the magnetism. Otherwise, their equipment will stick to the arch.
Characters on the south side of the room, further away from the arch when it activates, may roll 2d6 and 4d6 instead.

C6 - Hall of Voices
As the characters enter this room, they can hear the Veterans in C8 in discussion. Those Veterans are not aware of the effect. If the party continues moving - the voices dissipate and the effect does not manifest again.
C7 - Chapel of Monkeys
Wooden benches are thrown about and damaged in this room. Along the south wall is a detailed mosaic of a saint, defaced. A troupe of 11 Rock Baboons (B41) have made their home there and will defend it. Along the altar are old offerings amounting to 200 sp and 300 gp.
C8 - Foyer
Along the walls portraits of saints in various states of decrepitude are hung by small shelves, some with votive candles collecting dust. Three Veterans (B44), allies of the searchers in C3, are standing watch - cagey waiting for the return of their friends, having come in through the secret door in C9, and covering the band's intended egress route.
C9 - The Mausoleum of the Burned
Urns are placed into alcoves all along the walls. There are ashes in them - and nothing of value. Under a particularly fat urn in the south wall can be found a mechanism to unlatch the secret door.
D - Prison
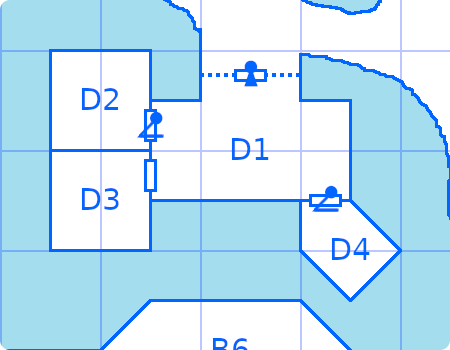
D1 - Mess
Tin and lead pales, some with chips and holes, are spread about the north part of the room. The corners and floor are covered in thick spider webs. A nondescript Gnoll-sized spider-silk bundle can be seen in the south east corner.
Three Black Widow (B43) spiders are hiding in the space - waiting for one of the creatures trapped in D2 or D3 to make a break.
D2 - North Cell
Four Gnolls (B35) are resting here - having barricaded the door against the spiders. They had been ambushed while in the D1 space by the Troglodytes currently in D3 - contention over the cave corridors - but had retreated when the spiders in appeared.
D3 - South Cell
Seven Troglodytes (B44) are resting and debating what to do next in this space. Having ambushed the Gnolls earlier, they had superior numbers, however had been unable to pursue the Gnolls into D2 without first dealing with the spiders in D1.
There is a 4-in-6 chance that the Troglodytes will be carrying a key to one of the locked doors in section E - determine randomly which one if the key is present.
D4 - East Cell
Two skeletons - one still manacled to the wall, the other a pile of bones on the floor, mournfully stare at the door. A tin collects dust by the door.
E - Trog Lair

E1 - Atrium
The ceiling of the room is tall, double that of the other rooms in the complex. In the center of the room is an oblong ovaloid mosaic depicting a crustacean. In the ceiling above the mosaic is a dome parallel to its shape - in the center of which is embossed a fish's skull. The room smells of Troglodyte.
The ovaloid mosaic is a trap. If a character steps into the mosaic, they will be sucked down - as quicksand - in 1+1d4 rounds: Save vs Paralysis to avoid. If a character sucked down is not rescued, they will suffocate.
E2 - Sanctum
Empty concrete amphora - chest high - line the north and south walls. Against the west concave wall, a curved shelf houses several scrolls. The scrolls contain the following magic spells:
- Hold Monster
- Contact Higher Plane
- Web (x2)
- Detect Magic (as Magic User)
One Hobgoblin (B43) dressed in black is searching the space for traps.
E3 - Buried Treasure
Rubble litters the floor - wedging the door and causing the "stuck" condition. On the northern side, most of the room is buried under sand and gravel having fallen in from the ceiling. From underneath the rubble, a tattered banner protrudes: buried. To the west, a similar banner - colored, but with no iconography - hangs from a stand knocked to one side but propped against the wall by the fallen earth.
On the east wall is a chest - locked, its bands styled in the same manner of the banners - containing 600 gold pieces and a thick amulet worth 400 gold pieces. Hidden beneath the rubble are two additional similar chests: one each containing 450 silver pieces: one additionally containing a jade broach (1,000 gp); the other containing two sets of earrings: one with hanging cats from them (1,100 gp), the other with hawks (1,100 gp).
E4 - Latrine
The stench of Troglodyte and Troglodyte refuse is overpowering.
E5 - Pantry
Rotting meat, some lentils, and several giant insect corpses have been stored here, lightly salted. Two Oil Beetles (B31) are rummaging about the mess.
E6 - Barracks
Straw pallets have been laid out around the room. The stink of Trogoldyte is potent in these cots. Four Troglodytes (B44) are gaming among themselves in the space between them. On these Troglodytes can be found 1,000 copper pieces - but in play at whatever game they are playing, 1,000 platinum.

Public domain artwork retrieved and adapted from
OldBookIllustrations.com. Attribution in alt text.


No comments:
Post a Comment